Thursday, June 07, 2007

The Good and the Bad

The good


This is one of two artichoke plants. The other is not quite as far along. I wasn't expecting to get any artichokes this year because I read that they must go through a winter before they will produce. I guess the cold snap earlier in the year fooled them into thinking that they had wintered over.


I think that this is a parasitic wasp sitting atop of a radish leaf. Parasitic wasps are good guys so I hope he hangs around.


The early girl tomatoes are starting to produce. I trimmed the tomatoes over this past weekend; It seems to have done some good.


This tray of baby carrots is coming along.


Planter #3 with the Mel's Mix removed. The strawberries seem to have acclimated to the boxes without a lot of stress. I hope this works out.


Crook neck squash growing.


The zucchini is coming along dispite the earwig damage.


The Bad


The snap peas are checking out. I didn't think that this would happen so early considering that the temps haven't been very high.


Frigg'n earwigs!

Sunday, June 03, 2007

The Highway of Death

In February of 1991, during the first Gulf War, a retreating Iraqi Army was attacked by Allied Forces as the Iraqi Army fled Kuwait en route, presumably, back to Iraq. The road that the Iraqi Army was traveling on is now often referred to as the "Highway of Death." The Allies, primarily the United States, were criticized for what some (probably the French) considered to be an unnecessary attack upon a (presumably) fleeing enemy. I recall watching some of the news coverage back then. I remember an Army General explaining why the Iraqi Army was attacked. He essentially said that a retreating army is still an army .... an army that can regroup, resupply, rest and then fight again.

The earwig invasion of my SFG is still ongoing. Primarily, the earwigs have been bombarding Planter #1. They have more or less left Planter #2 alone. Planter #3 lost watermelon and cantaloupe transplants and the Dahlias. There has been some munching on the strawberry leaves in planter #3, but not much. However, last night, when I conducted a search and squish mission, I noticed several earwigs on the developing strawberries. A quick look-see revealed that most of the strawberry fruit had been munched on. DRAT!!

I have a couple of cantaloupe transplants in the modular SFG that have grown enough (one has blossomed) that I had to get it next to a trellis before to long. All of the back squares in Planter #3 are open. I could:
#1: Transplant the cantaloupes into the back squares; or
#2: Set the modular SFG container on top of the Mel's Mix; or
#3: Remove the Mel's Mix from the square and set the modular container on the floor of the bed.

I chose to remove the Mel's Mix and set the modular container on the floor of the planter. Considering my current situation with the earwigs I wanted to keep the plant in the container. I have read that an earwig will not cross a line of Vaseline. What I thought I would do is to smear Vaseline on the underside of the lip, and therefore, hopefully, prevent the earwig from getting to the plant. I could have just set the container on the mix and left the Mel's Mix in the planter, but I figured that I would use it somewhere else since I wasn't going to plant anything in it.

I used a small shovel to cut an edge and remove the mix from B6. I worked well. The mix in the adjacent squares didn't fall into the emptied square. Now I could just set the container in the void and start training the plant up the trellis.

You might remember from my first post that I stapled landscaping fabric to the inside of the planters when I built them. I tore the fabric when I was removing the mix so I decided to just remove the remaining fabric from that square. I used a razor to cut away the fabric on the floor. As I pulled the fabric off of the floor and away from the sides and back ..... EARWIGS ..... A LOT OF THEM! Those suckers have been nesting in the space between the landscaping fabric and the wood. I immediately set to squishing them, but they caught me by surprise and I only got a couple dozen before the scurried away. They're actually pretty fast.

Well, I knew what I had to do .. remove the landscaping fabric. Along the back it was no big deal .. there was nothing planted back there anyway. I could just remove he Mel's Mix and remove the fabric. The problem was going to be the front of the planter because of the strawberry plants.

Now that I knew where the earwig army was based, I wanted to get rid of as many of them as I could, and hopefully demoralize them to the point that they wouldn't come back. I bit the bullet and decided that if I wanted to be victorious and annihilate the earwigs I would have to remove the landscaping fabric from under the strawberries.

Each 12"X12"X6" square in my SFG Planters holds approximately half a cu. ft. of Mel's Mix. The plastic planters I purchased at the 99 Cent Store hold approximately a third of a cu. ft. The 99 Cent Store planters are narrower and slightly deeper then the SFG squares. The strawberry roots had already spread out to about the width of each square that they were in. They were growing so well that I didn't want to trim the roots so they would fit in the plastic containers. I had some scrap redwood fencing available, so I made three 12"X12"X6" (approx.) boxes to transplant the strawberries into. For the first box I used redwood fencing for a floor; for the other two I did something a little different. Instead of attaching a redwood floor to the bottom of the boxes I snipped out a 1' square piece of 1/4" hardware cloth and stapled it to the bottom of the box. I then put a piece of window screen (cut to size) over the mesh on the inside of the box. The window screen will keep the mix from falling through the hardware cloth and keep the bugs out (including .. especially ... those frigg'n earwigs). The hardware cloth will allow for exceptional drainage and aeration of the mix. As carefully as I could I slipped a transfer shovel under the strawberry plant(s), lifted them out one by one and put them in their respective boxes. I'm hoping that by being careful and taking all of the plant and roots, that the strawberries won't suffer too much from transplant shock and they will continue to produce strawberries.

Now, back to those frigg'n earwigs.

After I removed the strawberries, I shoveled the remaining Mel's Mix out of the planter. I then took a break to consider my options and contemplate how I would execute a crushing attack on the battalion of earwigs that I was certain was lurking under the remaining landscaping fabric.

I considered bug spray, but it was a little breezy and I didn't want to over spray poison onto the veggies in Planter #2. I could use insecticidal soap; but that doesn't always kill right away, and I wanted to SEE dead earwigs .. LOTS of dead earwigs. So, in the end I decided that the best and the most satisfying thing to do was to squish 'em.

I pulled the fabric away from the sides of the planter, and ever so carefully ripped it from the staples that secured the fabric to the wood. Inch by inch I made my way down the side of the planter, freeing the fabric as I went along. I was very careful not to pull the fabric too far because I didn't want to disturb the sleeping earwigs. I freed up all the fabric at the left front and back corners. Now, the fabric that was previously secured to the inside of the bed was laying loosely on the floor of the planter. The fabric was neatly stacked along the sides of the planter where the sides meet the floor. I knew those nasty earwigs were probably concentrated in the corner(s), resting and preparing for another night of feasting on my plants .... I just knew it.

I paused and readied myself. The adrenalin was pumping .. finally .... revenge. But then, as if, as if it had pushed its way through a forest of watermelon and zucchini, my moral compass alerted me to the fact that what I was about to do could be considered shameful, barbaric, and even ...... unholy. It was a fleeting thought that I quickly dismissed. The enemy was at hand .. and they were mine.

Stealthily I gathered the loose landscaping fabric. I steadied myself as my grip on the fabric became tighter. I quickly rehearsed my plan in my mind. I would toss the fabric over my left shoulder so that my hands would not have to cross my body before I commenced the squishing; every second would count .. earwigs are cowardly, but they're fast.

Okay, feet planted, balanced stance, firm grip, ... ready, one , two, threeee ..............

I pulled the landscaping fabric up and to my left. The fabric suddenly stopped and was ripped from my gloved hands as my arms continued in their upward arc. SH!T .. I forgot that I had stapled the landscaping fabric to the bottom of the planter in the corners .... and not only that, I had double folded the fabric. The fabric remained attached to the planter and the earwigs had been alerted. The alarm was sounded .. DANGER, DANGER, THE COLONY IS IN DANGER. Then, I could see them .. EARWIGS coming out from under the fabric and escaping through the cracks in the floor .. THEY WERE GETTING AWAY!!!

I gathered a fist full of landscaping fabric and pulled as hard as I could. The force caused the the left front leg of the planter to come off of the ground a few inches. The fabric tore at the staples and dislodged from the planter. The breeze caught the fabric and it flapped in the wind. I looked like a crazed magician pulling the tablecloth out from under dishes. With the fabric hovering in the breeze above the planter .... I saw them .... hundreds of them! I didn't even bother to throw the fabric over my shoulder .. I had already squandered way to much time by forgetting about the extra staples. I let go of the fabric, and luckily the breeze carried it away.

Now that the fabric was gone and the earwig lair exposed, the earwigs were in full retreat. I commenced squishing them at a frantic pace. No dilly-dallying around, I employed a full handed press. I must have squished ten or so each time I slammed my hand down. But their numbers were great, there were too many of them. They were at a full sprint up the sides of the planter and along the floor. I started to use both hands so I could maximize the damage I was inflicting on the enemy. I needed to squish or cripple as many as possible, for a retreating army of earwigs that lives, is an army of earwigs that can come back to eat my plants another day.

Then, it seemed, that the attack had no sooner started, and it was over. My God, the carnage. The carcases of a couple hundred earwigs littered the floor and sides of Planter #3. Many earwigs escaped, through the bottom and over the sides. I stomped on as many of them as I could, twisting my foot to be sure that I ground their broken exoskeletons into the dirt. but I let a few go; "Tell your brothers and sisters in Planter #1, and #4 what just happened, and to expect the same .. if not worse. For as mighty as the earwig army may be, you are no match for me!!!"

Maybe the remaining earwigs will take heed and withdraw before I engage again.

Monday, May 28, 2007

Things are beginning to look (and grow) up

I'm still battling the earwigs. On most nights I'll squish a couple dozen that are on or around the plants; I supplement the squishing with drowning them in beer traps. I don't think I'm going to continue drowning them through .. as much as I hate earwigs .. I have better uses for the beer. All in all, I'm making progress in my war against the earwigs. I just need to continue my nightly recon and fire missions and I should be able to wear them down. My next avenue of assault will be to try to drive them away using a diluted mixture of liquefied habanero peppers and garlic. I have to wait though, until there is absolutely NO wind before I spray that stuff on the plants, I would hate to get a face full of it.

I lost a couple of plants to the earwigs. The watermelon in Planter #3-B1 and the cantaloupe in B5 had to be plucked; the strawberries in the front of the planter are doing well, flowering and producing fruit (nothing ripe yet).

None of the flowers in Planter #1-F1, F2 and F3 made it. The gladiola in F4 is making it's way up. The alysseum in F5 and the radishes in F6 are doing well. We've already eaten a couple of the radishes.

The bottom leaves of the snap peas planted along the trellis in Planter #2 are turning yellow and brown, but the tops of the vines are green, flowering and producing pods. The lettuce planted throughout is also doing well.

I'm a little worried about the bell peppers in Planter #4; they haven't grown much, although one is producing a pepper. The green beans are doing well. The cucumber took a lot of abuse during the earwig invasion .. I don't think it is going to make it.

One of the artichokes has produced a fruit .. yeah baby!

The tomatoes in the topsy turvy planters are doing so-so.

Follow this link to view the most recent pictures (too many to post here on the blog). I also included a few pictures that I took earlier, for comparison. The snap peas have made great progress as has the tomato barrel and pumpkin and corn barrel.

http://picasaweb.google.com/jmaellis/ThingsAreBeginningToLookAndGrowUp

Monday, May 14, 2007

Frigg'n Earwigs

Something has invaded, and has been munching on the plants in my SFG. Not the whole garden, but close enough. They have reduced some of the plants to just about nothing, and are (were .. fingers crossed) making lace out of the leaves of the cucumbers, watermelon, cantaloupe, zucchini and squash. They have been munching on my strawberries, bell peppers and green beans to a lesser extend. They have all but ignored the lettuce and snap peas. The plant lady at the nursery thought that it was some kind of a worm that was nibbling on the leaves. She recommended an organic insecticide. I used it ..... it didn't work.

I discovered it was earwigs a few night ago when I went out into the backyard after dark and snooped around the plants. Earwigs were everywhere. I squished as many as I could and then went inside to research how to get rid of them without using chemical insecticides.

So far I have trapped and drowned them for the past two nights in small cups and tuna tins. In the morning there is probably a hundred or so dead earwigs in the cups. I've squished probably about the same amount. Last night I killed a bunch using insecticidal soap and today I sprinkled diatomaceous earth throughout the beds. I'll see how things go over the next couple of days and if necessary, I'll regroup, reload and let go with a second barrage.

Monday, April 30, 2007

99 Cent SFG

I've been thinking that it would be nice to have a "modular" SFG. I had intended to make a bunch of 12"X12"X6" cedar or redwood boxes that I could move around the yard, put on a table or a ledge, bring inside, or whatever. I still might make a couple of them using scrap wood that I have laying around;

..........but,

the other day I was in the .99 Cent Only store. They sell a square plastic pot that is 7" deep and 8" across the top (it tapers down to 4" at the base). This size will make an excellent (I think, we'll see) container for my modular SFG. Because it tapers down to only 4" at the bottom I only intend to use these pots for the plants that are planted at one per square foot (such as tomatoes, peppers, cauliflower, broccoli, basil, zucchini, etc.).

The pots had a solid bottom so I drilled a couple of 1/4" holes in each, covered the holes with a small piece of window screen, filled with Mel's Mix and planted.

Below are 4 Early Girl tomato plants (the extras after planting the Topsy Turvys) and a couple of orphan cantaloupes.
This is a table that I built with a few 2"X4" that I used last year to frame up the concrete pad in front of my shed. The top is made of cedar fence boards, so I'm hoping it will last (maybe I should paint it). I use the top of the table as a kind of nursery; I intend to place my cold frame on the table during the fall/winter. The bottom is pot and tool storage. The blue water container (5 gal.) holds my sun warmed water.I purchased the rectangular containers at the 99 cent store also. They measure about 5" deep, 6" across and 14" in length. I bought a few of them to hold flowers and the like, but ended up using them for my SFG because I was in a pinch.

From left to right, (4) containers with extra strawberry plants, 1 container of baby carrots and one container of Thumbelina carrots (from seed, planted 4/24/07). Along the back is an Aloe Vera plant (in a terra cotta pot) and 6 pepper plants (different kinds such as Habanero, Jalapeno, Cayenne, and a couple others) planted in the square .99 Cent Only store containers.

Tuesday, April 24, 2007

Topsy Turvy Tomatoes

Last year I grew an Anaheim Chile plant in a "Topsy Turvy" planter. Typically these inverted, or upside down planters are used for growing tomatoes. The plant, whether it's a chile or a tomato, hangs down from the bottom of the planter and grows down toward the ground (see http://www.topsyturvys.com/). The is a foam grommet at the bottom that prevents the soil from falling out. Watering is accomplished through a hole in the top of the planter. The Topsy Turvys come in a couple of different sizes, some can handle multiple plants.

Last year I hung the planter from the awning in my back yard. It did okay there, but that part of my home doesn't get much sun. This year I wanted to hang the planter(s) at the back of my yard, near the fence (north side of the property) so they would get more sun. The planters are about 2' in length from the bottom of the planters to the hook at the end of the hanging wires, so unless they are hung from at least 6' up, the amount distance for the plants to grow before they hit the ground is limited
(see some pictures from the Topsy Turvy web photo album).

I didn't have anything along the back fence that would work to hang the planters from, so I had to install something. I considered sinking a 10' post along the fence, but that would mean that I would have to dig about 2' down and the post would be forever there. I wanted to have something that I could move around from year if I had an itch to do so.

What I ultimately decided to do was to buy a 3 gallon bucket, an 8' redwood 4"X4" post, a 1/2 wine barrel, two 60 pound bags of Quikrete, and a couple of brackets to hang the planters from.

First, I centered the post in the bucket, then filled the bucket about 3/4 full with the Quikrete, and then added water and let it seep into the concrete until a pool of water formed at the top of the bucket. I attached a post level and held the post perfectly vertical for about 10 minutes until the concrete mixture was firm enough that I could let go. I let the concrete set until the next day.

The following evening I picked the spot where I wanted the planter to be located and moved the 1/2 wine barrel to that spot. I put the bucket/post into the center of the barrel and then drilled a 1" hole in the bottom of the wine barrel half way between the wall of the barrel and the bucket, one hole on each side of the bucket. I found some spare 3/4" PVC pipe, cut it into two 2' long pieces and then pushed the pieces into the holes I had just drilled in the bottom of the barrel (the pieces of PVC need to be taller that the top of the 3 gallon bucket). I mixed the second bag of Quikrete (and the remaining Quickrete from the previous day) with water in a wheel barrel. After making sure that the 3 gallon bucket was sitting perfectly flat on the bottom of the wine barrel, I shoveled the wet concrete into the wine barrel and around the bucket. Once all the concrete was in the wine barrel (it came to about 3/4 of the way up to the top of the bucket) I used a small garden shovel to make sure that the concrete was distributed more or less equally around bucket and had filled in between the bucket and the PVC pipes and the PVC pipes and the sides of the wine barrel. For the next few hours I periodically gave the PVC pipes and bucket a turn so that the concrete wouldn't cement them into place.

The following day, after the concrete had sufficiently set, I pulled the PVC pipes out; the holes where the pipes were are now two very large drain holes. I covered the drain holes with small pieces of aluminum window screen (so the potting soil would not plug up the holes) and filled up the rest of the barrel with potting soil. I attached brackets to the top of the post and hung the Topsy Turvy planters (the brackets could also be installed before the post is set in concrete).

I can water the Topsy Turvy planters with a wand type attachment on the hose; however, what I typically do is just stand on the edge of the barrel and water from a watering can; a small step stool will also work.

I planted wild flowers in the potting soil, once they bloom I think it will look really nice.

If I ever want to relocate the planter all I will have to do is remove the soil, pull out the bucket (and post), use a hand truck or dolly to move the barrel, bucket and soil to their new location and then reassemble.
The picture above shows the my Topsy Turvys with Early Girl tomato plants. I have to watch the amount of water I put into the top of the Topsy Turvy planter. Excessive watering will cause the water to continually drip onto the plant and they will rot, I had a couple of failures because of this problem. It's also advisable to wait until the plants are just about to bust out of their transplant containers before putting them into the Topsy Turvy planters
.

Monday, April 23, 2007

Moving things around a bit

The SFG has been doing well, but I made a few changes to the layout and add a few plants.


Planter #2, square B1 had a watermelon plant and B2 was empty (to accomodate the future size of the watermelon). Well, the watermelon didn't make it .. so it got plucked. When I planted the snap peas in planter #2 (6 plants per square in B3 & B4), I had not yet put up the trellis. Once the trellis was in place I realized that the pea plants at the front of the square would have to climb over the plants at the back of the square in order to get to the trellis. Since B1 and B2 were now open I decided to carefully replant the 6 pea plants in the front of squares B3 & B4 to the back of B1 and B2. Now all 12 pea plants are along the trellis.


The cantaloupe in planter #3, square B6 also did not make it .. plucked.


With only 3 pea plants each along the back of planter #2, squares B1, B2, B3 & B4, that left a lot of room for other veggies in those squares. I purchaesed 8 additional buttercrunch lettuce transplants. I planted 4 in square F1 (previously empty), and two each in the front of squares B1 and B2. I read the radishes are a good companion plant for both peas and lettuce so I planted three (from seed) in the middle of squares B1, B2, B3 & B4. I intend to plant something in the front of squares B3 and B4, but I'm not sure what .. something other than buttercrunch lettuce.


On Monday evening, 4/23/2007, I harvested from my SFG for the first time. I trimmed the mature leaves from the buttercruch lettuce in planter #2, square F2 and red lettuce in F3 and made a salad. There was enough lettuce for the three of us with a little left over. YUM! With the additional lettuce that I planted and the future addition of spinach in squares F4, F5 and F6, I expect that I will have greens for a salad at least every other day.


This picture shows the peas along the back of squares B1, B2, B3 & B4, the buttercrunch lettuce in F2 and the red lettuce in F3 (planter #2)


Close-up of the lettuce in planter #2, squares F2 & F3.


Watermelon in planter #2, square B6.


Dahlias in planter #3, square F6.


Radishes (from seed) in planter #1, square F6.

Sunday, April 22, 2007

Trellises

On Sunday afternoon, after the rain had stopped I managed to get the trellises up.


I used 10' long, 3/4" thin walled electrical conduit to make the frames for the trellises. I bent the conduit at approximately the 7' mark, put one on each side of the planter and connected the tops using a fitting. I attached the frames to the planters using U brackets. The bottom of the trellises rest on a 6" wide mow strip, so I don't have to worry about them sinking into the ground.


I wanted to use concrete reinforcing mesh instead of nylon for the trellises, but the only place around that had 6"X6"grids was sold out. The only other option was 4"X2". I decided to just buy the trellis material made out of nylon; I'm hopeful that it will work out okay.


The total cost per trellis was $15. I could have used 1/2 inch conduit and saved $4 per trellis, but I wanted the extra strength.


Guestbook Question: Pest Frames (and lessons learned)

Great looking SFG! I'm building my first one this year. I'd love to make screen frames like yours. So I wanted to ask you about the detail of them. I can't tell but is there mesh on the top of the frames as well? Are the openings in the mesh small enough to keep out insect pests? And can the frames be used while trellising veggies? I'll look for your response. Thanks!
Tia

Hello Tia and thank you for reading my blog.

Yes, there is mesh on the top of the frames. The small square openings in the mesh are not small enough to keep insect pests out (well, maybe really large bugs), just birds and the like.

As to whether or not the frames can be used while trellising, I'm not exactly sure what you mean. I suppose the plants could grow through the mesh and up a trellis, but I'm not sure what that would accomplish as the fruit would be on the trellis and therefor outside the frame. However, I did make two 1' wide frames that I intend to continue to use on the front half of the planters while trellising the back half.

Now, a couple of lessons learned about the protective frames:

  • If I had it to do all over again I would have made all the frames 1' wide, that way I would have more choices when it comes to which portions of the planters need protection.
  • If I had it to do all over again I would have designed the frames so that one side (the front or the back) is a little shorter than the other. It rained heavily this past Thursday night and Friday morning; I covered the planters with tarps so that they wouldn't get deluged with water. On Friday I noticed that the water had pooled on the top of the tarps and the weight of the water was causing the mesh on the tops of the frames to sink (the frames are light weight and not designed to support weight). The weight of the water caused the mesh to break away from the frame in a couple of places. If the frames had been angled, the water would have just run off. Now that I have the trellises up, I can just drape the tarp over the trellis (trellis post coming soon).

Saturday, April 14, 2007

Guestbook Question: Do the sides of the beds bow?

"Hey,
I am just starting to garden and had been looking all over for inexpensive wood! Fence slats! Eureka@! I just purchased ready made beds from a cool place in Massachusettes, but will use your method here for a couple smaller beds. I've been told not to use anything thinner than 2" for the sides, so was looking at 2x12 redwood...$$$$. Have you found the sides bow at all?? Will check in on your blog. So far, your little site has been very informative!Thanks!
Kelly"

Hello Kelly, and thanks for reading my blog.

The fencing that I have been using is 5/8" thick (actual). The beds are 6' long X 2' wide. The ends of the fence boards are secured to a 2X4 (nominal). I would only expect to see bowing along the 6' lengths (the front and back of the beds); I have not. The SFG beds are new, so they are not a good point of reference; however, the 6'X2'X15" cedar bed I built last year has been filled with about 12 cu. ft. of potting soil for over a year now and the sides have not bowed at all; the floor is still solid also.

Let's talk a little bit about cost:

Keep in mind that my beds are "elevated" off of the ground, so there is no ground contact with the fencing, they do not get kicked, weed whacked, hit with shovels or lawnmowers, etc. If I was using fence boards to make raised beds that sat on the ground I would feel comfortable doing so, but I think I would probably double them up to increase the thickness. A 3'X3'X6" raised bed that sat on the ground would cost me around $15 (cedar) at Home Depot (4 fence boards and a 2X4X6 redwood stud to cut up and connect the corners to). Those same dimensions using 2"X6" redwood lumber would cost about $18 (one 2"X6"X12'). I didn't see 2"X12" redwood lumber at Home Depot, but I imagine that would be considerably more.

Since I would rather have beds that are elevated off the ground, the thickness of one fence board is sufficient. The three elevated planters that I built cost me $23 each (the redwood fencing was on sale, otherwise it would have cost me $35 each). The elevated beds cost more because of the extra cost associated with the floor. In addition to three extra boards for the floor, I had to purchase 8" wide fence boards to compensate for the floor thickness (and the height of the ledge that the floor sits on); 8" fence boards are a couple $ more per board than 6". If the 8" wide redwood fencing wasn't on sale I could have used 6" cedar boards for the floor and saved a couple bucks. If I had used the 6" cedar fence boards for the front, back and sides of my SFG beds that would have save me about $8 per bed, but I would have ended up with beds that would only be about 4.5" deep. (For whatever reason, Home Depot doesn't sell 8" wide cedar fencing.

There are some options to reduce the cost of the elevated beds. A significant cost savings can be achieved by using whitewood fence boards and studs. But since whitewood is primarily pine or fir, I would be concerned about it rotting fairly quickly unless is treated it in some way, which would then increase the cost. So I decided to stick with redwood and/or cedar when building my elevated beds. I'm hoping that the initial extra expense will ultimately save me $$ because the beds will last longer.

Wednesday, April 11, 2007

Tea Time

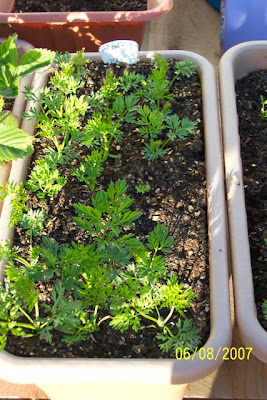
You might remember from a previous post that I am not a true "green" organic gardener. I have used commercial fertilizers in my garden, but I have yet to use pesticides on my fruits and vegetables and if I can avoid it .. I will.

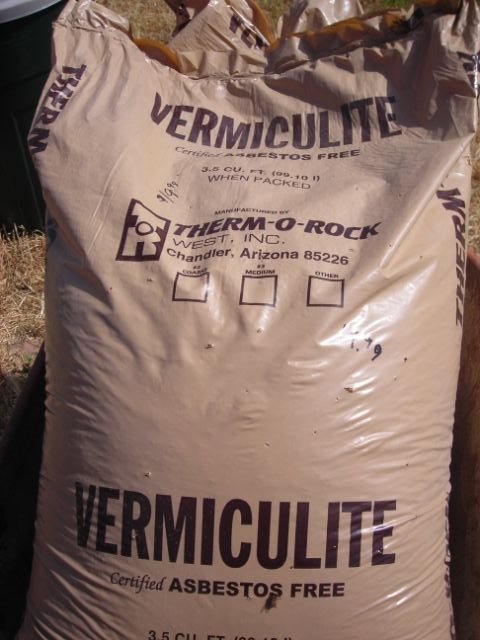
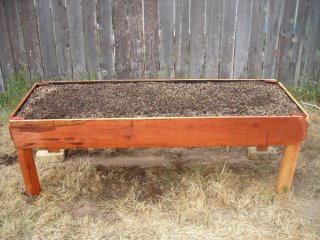
I've been looking for a way to reduce or possibly even eliminate the amount of fertilizer I use in the vegetable garden. Mel's heavy use of blended compost in the SFG method is designed to eliminate the need for fertilizer, so that's taken care of, but I still have one "traditional" planter that is filled with potting soil; then there is the apricot tree that I planted in a 1/2 wine barrel, my wife's tomatoes (also in a 1/2 wine barrel), my tomatoes (in inverted planters .. more on that adventure in a future post), and the other various plants I have in potting soil. I also wanted to look into natural pesticides in case I run into a problem with the wrong kind of bug. Now, I've taken a step in the right direction by using cedar and redwood to construct my planters, both woods have natural insect repelling properties.

I came across a few internet articles that discussed the benefits of "compost tea." In summary, compost tea, if brewed properly, is both a fertilizer and a "bad" insect/organism repellant. I didn't quite understand all the science involved, but I think compost tea may be what I have been looking for.
(Read about the science behind compost tea)

The recipe is simple enough: water + compost + aeration + molasses + time = compost tea.

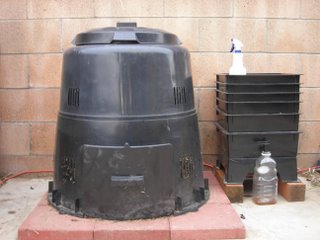
All the articles I read used a 5 gal. bucket as the kettle; the amount of compost varied from about a gallon worth, to half of the bucket. Aeration is accomplished using an aquarium air pump and air stones; molasses (about an ounce) is added to feed the microorganisms while brewing for about two to three days. After searching around I found an article that described how to make your own compost tea brewer .. here's what I did:

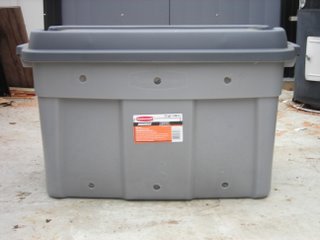
I used a 5 gal. paint bucket. I washed out the bucket and then drilled several 1/4 in holes around the top of the bucket, just under the rim. You need sufficient holes for air to vent out of the bucket while the tea brews. If you don't have sufficient venting ..... boom!

I drilled a hole in the center of, and two additional holes closer to the edge of the lid.

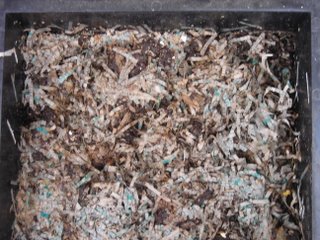
I used two tube socks to hold the compost. Some of the articles I read had the compost loose in the bucket which was filtered using cheese cloth or a similar material/mesh after the brewing was complete.
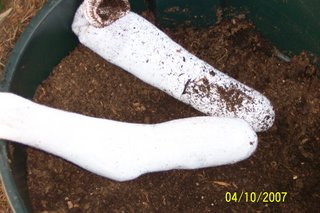
I purchased a cheap dual outlet aquarium air pump at Wal-Mart. I also purchased two large air stones, two small air stones, two "T"s and 25' of tubing.

I filled the socks about 3/4 full of compost and then ran about 12" of air tubing (with a small air stone attached to the end) all the way into each sock and then worked it into the center of the compost. I connected the two air tubes using a "T". I used about an arms length of twine to tie off the end of the sock and to hold the air line in place.

Next I ran the both ends of the twine up through the hole in the center of the lid, and then one each down through the two additional holes in the lid. I pulled the string tight so that the socks were up against the lid and then tied off the strings so that the socks would dangle while the tea brewed.

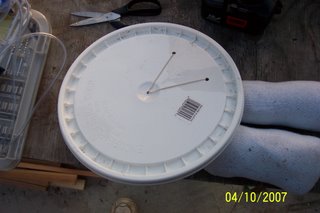
I cut about an arms length of air tubing and attached one end to the "T". When I was ready to put the lid on I ran the long air tube out of the bucket through one of the holes that I drilled near the rim.

Next, I attached about 8" of air tubing to each of the two large air stones, connected the ends to the second "T", attached an arms length of air tubing to the "T" and then ran it out another one of the drilled holes.

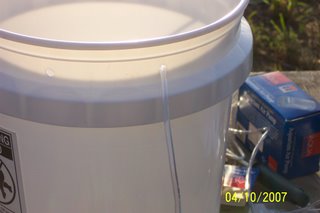
If you are using tap water from a municipal water supply you must aerate the water for at least an hour so that any chlorine can evaporate. The chlorine will kill the micro-organisms in the compost.

Add about an ounce of unsulfured molasses to the bucket.

I used an air pump with two air outlets. If your air pump has only one outlet you will need to use a gang valve to split the air supply. I could have used a gang valve instead of the "T"s. If a gang valve is used you won't be able to put a lid on the bucket because the valve will hang from the rim. In my case I put the lid on, plugged in the air pump, connected the airlines and let it brew.

I brewed this compost tea for 48 hours. The presence of foam is a good thing, it indicates that the process is working.

The socks did a good job holding the compost, there was very little "sludge" in the bottom of the bucket. I emptied the compost from the socks into the compost bin. I like how the socks worked, but I think will look for a thin mesh bag for next time.

I used the compost tea as a fertilizer in the soil and as an insect repellant on the plants. I think I will brew a batch about every two weeks and see how it performs.

Sunday, April 08, 2007

The Plants Are In

The rain that had me so concerned on Friday turned out to not be such a big deal. It rained a little bit in the very early morning on Sunday, that's it.

It's been a very very busy weekend. When I first planted in my SFG beds about a week ago I put in a few transplants and also planted a few cantaloupe and snap pea seeds. When I removed the compost to remix (see previous post) I couldn't find most of the seeds. I then found the outer shell of the cantaloupe seeds among the young vines of the watermelon plant. The birds had dug up the seeds and ate them. A closer inspection of the young plants indicated that the birds had been nibbling at the leaves. Mel Bartholomew has a solution for this problem. In his book he describes how to make a chicken wire type of dome that can go over the planters. The dome will keep pests, like birds, out of the garden. The chicken wire dome can also be used as the framework for other garden structures. For instance, plastic sheeting can be draped over the frame to make a temporary green house or to protect the plants from harsh weather. I did something similar. I framed up a 6'X2'X2" box using redwood fence boards that I cut to size and connected using brads (Note to self: "Be sure to change the 2" brads to 1" brads when connecting thin boards .. also, find out when you last had a tetanus shot). Instead of chicken wire I used a stiff plastic garden mesh that I stapled to the frame.

Since I'm so far behind in planting this year I decided to plant with transplants rather than sew seeds. My wife and I went to OSH and purchased a few vegetable and flower transplants to put in the garden.

The planters are divided in square foot segments by the use of a string grid. In each square foot grid I can plant between 1 and 16 plants, depending on what exactly I am planting. For instance, as per Mel's book, zucchini can be planted 2 per square foot, broccoli is 1 plant per square foot, lettuce is 4 per square foot. Some plants require more than one square foot, such as watermelon and strawberries. Plants that require trellising are located in the back, on the North side of the planter (I will be building trellises next weekend). All vining plants are trellised, even watermelon and cantaloupe. For ease of reading I have divided my planters into front and back rows and numbered each square foot grid sequentially from left to right; so, the square in the back left corner is B1, the square in the front right corner is F6.

Planter #1 (the wife's):

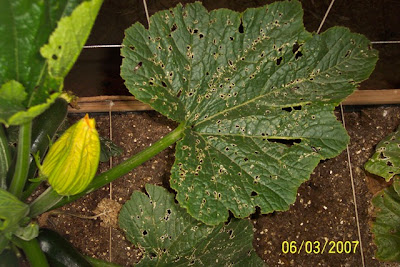
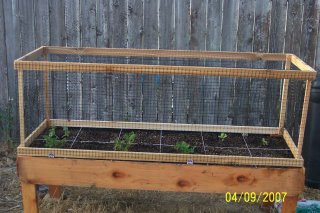
The only thing planted in #1 so far is a zucchini in B1. In the picture above you can see two of the screen frames that I built. These two screen frames are only 1" wide so they are modular, I can use 1 or 2 depending on what's been planted and whether or not I need the entire bed protected. In the picture I have one frame lengthwise across the back six squares.

Planter #2
B1 & B2 = Watermelon; B3 & B4 = Sugar Snap Peas (9 per sq. ft) .. I didn't buy enough so I only have 6 per sq. ft.; B5 & B6 = Watermelon

F1 = Empty (future lettuce); F2 = Lettuce (4 per sq. ft.); F3 = Empty (future lettuce)
F4, F5 & F6 are empty. I intend to plant spinach here (9 per sq. ft.)

Planter #3
B1 & B2 = Watermelon; B3 & B4 = Empty; B5 = Cantaloupe; B6 = Cantaloupe
F1, F2, F3, F4 = Strawberries (3 per 4 sq. feet); F5 & F6 = Empty (Dahlia's are planned)

This is the elevated bed I built last year. It's filled with a traditional potting soil growing medium (and worms .. see the "Got Compost?" post). It will be interesting to see how this bed does compared to the SFG beds (These plants have been in for about a month. I've used a liquid fertilizer; I'm just now starting to see significant growth.
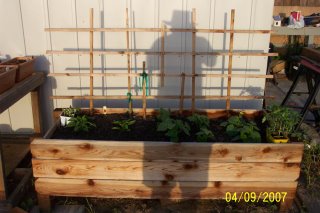
From L to R: Green bell pepper, red bell pepper, green beans (5 plants) and a cucumber on the back right. The plants still in the containers are extra tomatoes and cantaloupe that I'm not yet sure what I am going to do with.

Mel's Mix

I was at work this past Friday morning and noticed that the Yahoo! forecast called for rain on Sunday. I had all kinds of things that I needed to get done in the garden and backyard during the weekend and rain would definitely put the brakes on some of those chores. I decided to burn 1/2 a day of vacation and take the afternoon off.

You may remember that I cut a couple of corners when I initially filled my elevated SFG beds. I didn't follow the Mel's Mix recipe and consequently I ended up with a growing medium that was almost entirely compost. After I left work on Friday I purchased the Vermiculite and peat moss (8 cu. ft. of each). I compared the price of the baled peat moss at the nursery near my home with the bagged Miracle Grow peat moss at Home Depot; the price per cu. ft. was essentially the same. Now, I'm an environmentally mindful person, I try to do at least my share of recycling, and I'm becoming more aware of what I put into my body; but, I don't commune with the trees and the only "herbs" I grow are the ones used to cook with .. so even though the Miracle Grow contains fertilizer, and therefore is not "organic", I went with it anyway.

I got the Vermiculite and peat moss to my home and started constructing the third and last elevated planter. After the bed was completed I had a total of 36 sq. ft. of surface area in which to grow my SFG. Each planter holds 6 cu. ft. of fill, so I needed to mix a total of 18 cu. ft. of Mel's Mix; 1/3 is Vermiculite, 1/3 is peat moss and 1/3 is blended compost. The two beds that I already filled contained 5 cu. ft. of what was essentially just compost. I carefully removed the plants I already had in there and set them aside. I then emptied the compost from the bed onto a large tarp that I put on the ground. I had about 1 cu. ft. of extra Pay Dirt compost left over from awhile back, so I added the extra Pay Dirt to the pile to get it to 6 cu. ft. of compost. I then added 6 cu. ft of the Miracle Grow peat moss and 6 cu. ft. of Vermiculite. I enlisted help from my daughter to pull the corners of the tarp towards each other a few times to thoroughly blend the Mel's Mix.

Now that I had my Mel's Mix all blended, I removed the plants from the other bed, and put the compost from that planter into a trashcan. I'm sure that I can find plenty of uses for the extra compost; actually, I still have 2 cu. ft. each of Vermiculite and peat moss left over, so I can make more Mel's Mix when I need it. I filled each of the three planters with 6 cu. ft. of Mel's Mix, and then replanted all the plants.

The blended compost on the tarp.

Add the other ingredients and mix it up

And in the planter

Saturday, April 07, 2007

Got Compost?

Just so you know, in case we ever meet, I've got bad case of worms!

About six months ago I purchased a Worm Factory (
see here) vermiculture composter and started using redworms to compost my kitchen scraps. It took a little while before the worms started to eat and reproduce, but once they did .. watch out. Those little suckers are pigs, they eat like crazy and are prolific breeders.

Of course it's environmentally friendly to limit the amount of garbage that ends up in the landfill, even if it's only kitchen scraps; but that isn't why I'm composting using worms, the real reason is .... their poop. Worm poo, or "castings" are relished as a natural fertilizer. There's some debate as to whether or not the worm poo is "organic". Some of the greener folks feel that the castings aren't organic unless the food that the worms eat is also organic. As for me ..... w-h-a-t-e-v-e-r.

My Worm Factory is a 5 tray system. The trays stack on top of each other. As one tray becomes full of worm poo, I begin adding food to the tray above it. Then as that tray fills up with poo, I start adding food to the next tray. The trays have small holes in the bottom which allow the worms to migrate up into the tray(s) with food. When the 5th tray becomes full you empty all the worm poo out of the 1st tray, rotate it to the top and start filling it with food. The tray that you are putting food in is called the working tray. The sequence can continue forever. A healthy Worm Factory can produce a tray of worm poo fertilizer a month.

Redworms will eat anything organic. Kitchen scraps (but not meat products or cheese) are the most common food for redworms; but they will also eat paper, natural fibers, cardboard, leaves, grass clippings (you have to be careful with green grass because it can heat up when decomposing and bake the worms. If that happens you will end up with worm/poo pie). Redworms are especially fond of coffee grounds.

Now, worms are not all that different then you and I. When they eat they not only poo ... they pee. The base of the Worm Factory is a reservoir that collects the worm wee. It has a spigot type of drain that allows you to collect the wee. Worm wee is also a great fertilizer. I have a plastic juice bottle under the drain, I just leave it open so it is always draining. When the bottle gets about 1/2 full I'll dilute the worm wee with an equal amount of water and use it as fertilizer in the garden.

The Worm Factory is on the right. On the left is an
Earth Machine backyard composter. I use the Earth Machine to compost grass clippings and leaves. I have also recently secured a source of chicken poo and goat poo to add to the compost bin. Animal poo is excellent to compost as long as the animal is not a meat eater (no dog, cat or human poo in the compost bin!!). I'm looking for a source of rabbit poo .. that would be some great sh!t.


The working tray of my Worm Factory. This tray is full. I need to begin adding food to the tray above. The worms will eat the remainder of the shredded newspaper on their way up into the next bin.

I mentioned in my first post that last year I built my first elevated planter. I hadn't yet heard of Square Foot Gardening, so that planter was deeper (6' X 2' X 15") and filled with general use potting soil. To improve the soil condition I purchased a cup of earthworms at OSH (abt. 200 worms @ $10) and put them in the planter (Note: earthworms and composting redworms are completely different, they are not interchangeable). This year, in February, I tilled all the soil in that planter to get it ready for planting (still hadn't heard of SFG yet). I was pleasantly surprised at the amount of earthworms in the planter. They had obviously multiplied and ate from the organic material in the potting soil; they were large and active. I mixed a bunch of leaves into the soil to give the worms plenty to eat and then planted a few vegetable plants into that bed. I decided that I want to add earthworms into all my planters and pots in which I use regular potting soil.

Now, I'm cheap, and I didn't want to continue to purchase earthworms. What I did instead was make a worm habitat so I can breed my own earthworms. I used a 37 gal. Rubbermaid plastic storage container and drilled several 1" holes for air circulation and glued aluminum window screen to the holes to keep pests out and the worms in. I installed a drain by drilling a 1" hole on the side near the bottom. I cut the top off of a water bottle and glued it into the hole (totally water tight). In order to keep the soil elevated above the drain I constructed a crude elevated floor in the container using landscaping stakes and more aluminum window screen. I filled the container with left over potting soil and leaves, wet it down thoroughly with the hose and added the last container of earthworms that I intend to ever buy. I'm hoping that by planting season next year the worm habitat will have thousands of worms that I can use for my planters and beds, and for continued breeding.

Inside the earthworm habitat.